Hello there,
Let’s work together to create an AKS cluster! Recently, I was tasked with creating an AKS cluster for a company that had an on-premise infrastructure, with the purpose of using the cluster for their internal websites. My job was to provide this cluster so that the developers could migrate the websites from the on-premise Kubernetes to the one in Azure. The design for the AKS cluster is shown below.
In this example we used two subscriptions.
Subscription A is used for the ‘Hub’ where the fortigate firewall is configured for incoming/outgoing traffic to their on-premise network.
Subscription B is where the AKS cluster is located.

First, we’re going to create the Azure Key Vault, Managed Identities and the Container Registry.
The Container Registry will be connected with a Prive Endpoint to be secure as possible.
Due to the peering between the hub and corp vnet’s, it’s possible for on-premise network to connect to the Container Registry or the AKS Cluster.
Managed Identity
- Go to the Azure Portal > Search for Managed Identities
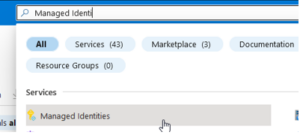
- Select > ‘Create managed identity’
- Fill in the basics, select a resource group and give the identity a name
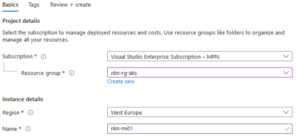
- Select ‘Review + create’
- Select ‘Create’
Container Registries + Key Vault
- Search for the Container Registries
- Select ‘Create container registry’
- Fill in the basics, see my example;
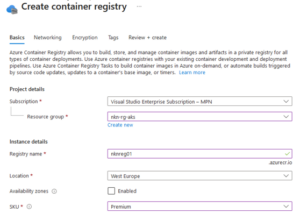
In this case, we used the ‘Premium’ SKU, so we could use the private link with private endpoints to restrict access to the registry
- Select ‘Next: networking’
- Select ‘Private Access’ > ‘Create a private endpoint connection’

- Fill in the details. Make sure you select the subscription where the aks cluster will be located. Same for the Virtual Network.
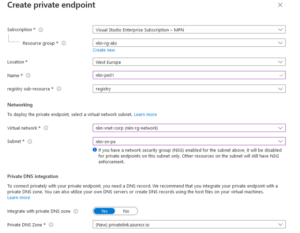
- Select: ‘Next: Encryption’
- Click Enabled (we want to have it as secure as possible, so that’s why we check enable. This will encrypt your images and other artifacts) > Select the managed identity we created in the previous step (this will be used to authenticate without storing credentials in code).
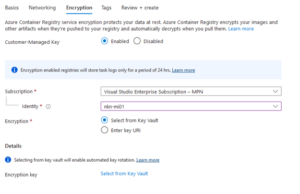
- Then we’re going to create a Key Vault. Select ‘Select from key vault’
- Select your subscription (for our example it’s the corp subscription) > Select ‘Create new key vault’
- Fill in the basics
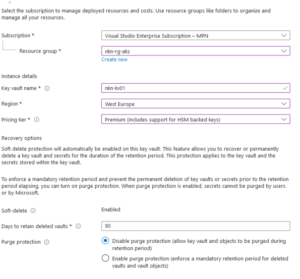
In this example we’re using the premium tier, because of the HSM protected keys. This means that it’s encrypted on hardware instead of software which is less secure - Select ‘Next’
- On the Access policy screen, you can configure a vault access policy or RBAC, for now we’ll leave this standard. Let’s discuss this in another blog post > next
- Disable ‘Enable Public Access’ > Select ‘Create a private endpoint’
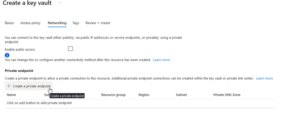
- Use the same config as last private endpoint
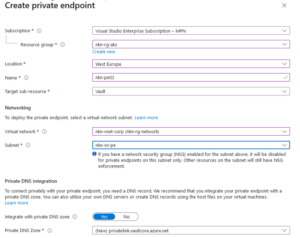
- Now we’re ready to create the key vault > Select ‘Review + Create’ > ‘Create’
- As I was not connected to the on-premise network or the vnet, I had no access to the key vault. In order to proceed, I needed to create a firewall rule in the key vault that would allow access from my home address.
- Select ‘Create new key’
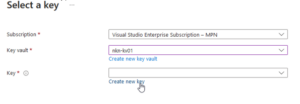
- Fill in the basics
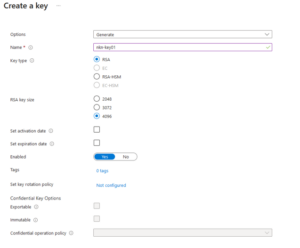
Although it is possible to increase the security of the system by implementing an expiration date and a rotation policy these options will not be utilized in this example. - Select ‘Create’ > ‘Select’ > Then ‘Review + Create’ > ‘Create’ to create the container registry
- The deployment will start
That’s it for the Container Registry, let’s create the AKS Cluster!
- Go to the Azure Portal > Go to Kubernetes Services
- Select Create > Create a Kubernetes cluster
- Fill in the basics. In this example we’re going to use the standard cluster preset configuration.
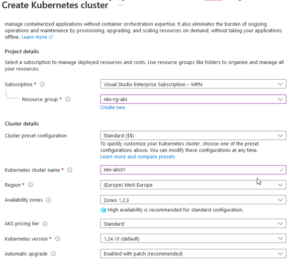
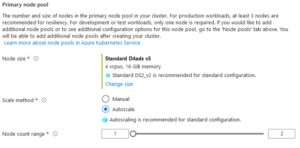
- On the next page (‘Node Pools) we’ll leave it default
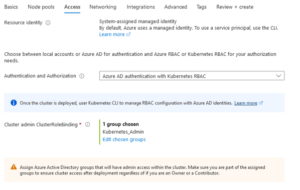
- In the ‘Access’ tab we select ‘Azure AD authentication with Kubernetes RBAC’ > Select a specific admin group for the Cluster Admin
- On the ‘Networking’ page we’re going to use Azure CNI and ofcourse, the ‘Private Cluster’ option.
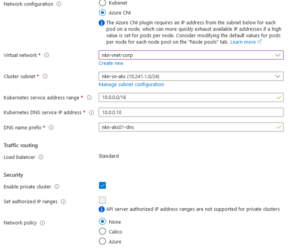
It is much easier to use ‘Kubenet’, because with Kubenet nodes get an IP address from a virtual network subnet. Network address translation (NAT) is then configured on the nodes, and pods receive an IP address “Hidden” behind the node IP. This approach reduces the number of IP addresses that you need to reserve in your network space for pods to use.
- On the ‘Integrations’ tab we’re going to select our previous created Container Registry > Other settings we’ll leave default
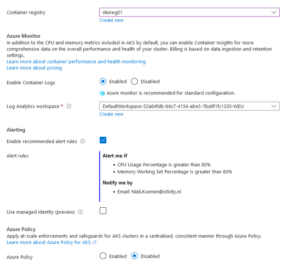
- In the ‘Advanced’ tab you can change your infrastructure resource group and then we’re going to create the cluster after the validation is completed
After creating an AKS cluster with Private enabled on the Azure network, the question arises as to how to connect to the cluster using kubectl. The cluster is automatically connected to the ‘corp’ VNet via a private endpoint, enabling connection to the cluster using a VM on the same VNet. Furthermore, a peering between the ‘hub’ and ‘corp’ VNet enables everything connected to the ‘hub’ vnet to access the AKS cluster. However, the issue lies in the fact that the hostname cannot be found on the on-premises network, as the default azure DNS servers are not being used.
What we need to do is configuring a new ‘DNS zone’ on the on-premises DNS server.
If you go to your private DNS zone in Azure, you’ll see a Private DNS zone like:
‘ID.privatelink.westeurope.azmk8s.io’.
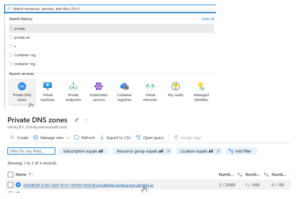
That will be your DNS zone. Click on the DNS record and it will show a name and IP address. This will be your ‘A’ record within the DNS Zone.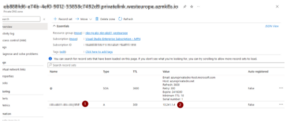
Now we succeed to connect to the AKS Cluster with kubectl from the on-premises network!
Lessons learned.
As part of a test to gain a better understanding, I attempted to reboot the AKS cluster. However, upon restarting, the cluster failed to function properly. I will keep it short, because of the long blog post. It is necessary to recreate the private endpoint and Private DNS record after shutting down and restarting an AKS cluster. Additionally, there is a possibility that the IP address of the private endpoint may change. In such cases, it is important to update the IP address in the DNS record, as well as the A record on the on-premise DNS zone. I learned this lesson the hard way, and it took me a considerable amount of time to figure it out. Hopefully, someone reading this will be able to avoid making the same mistake.
Thanks for reading!

